


Showing posts with label Dessert. Show all posts
Showing posts with label Dessert. Show all posts
Saturday, March 14, 2020
Mary & Lizzy’s Quadruple Chocolate Cheesecake
Here is our super amazing cheesecake recipe. Its our recreation of a Cheesecake Factory cheesecake. It makes ALOT. Or maybe not so much if you're eating for two...
Although you can probably use chocolate chips, the chocolate bars will melt better and be fancier. We use a food processor to chop the chocolate because it takes a lot. We couldn't find bittersweet chocolate so we substituted semi sweet and it was great! So either is fine.
It has multiple steps and layers, but its not technically very hard. We love being able to cook the crust cake layer and cheesecake at the same time. Enjoy!

Servings: 16-20
Flourless Chocolate Cake (Crust)
4 ounces bittersweet chocolate, chopped and melted
1 stick butter (8 tablespoons), melted
¾ cup sugar
3 eggs
½ cup unsweetened cocoa powder
Preheat oven to 350. Spray a 9-inch springform pan with non-stick spray.
In a food processor, chop chocolate into small pieces. In microwave, melt butter. Add chocolate and microwave as needed just to melt chocolate.
Stir in sugar, eggs and whisk well. Sift unsweetened cocoa powder and mix in. Pour into the springform and set aside while preparing cheesecake layer.
Chocolate Cheesecake
6 1-ounce squares semi-sweet chocolate, chopped and melted
2 8-ounce packages cream cheese, softened
½ cup sugar
2 eggs
1 1/3 cups sour cream
¾ teaspoon vanilla extract
Chop chocolate in a food processor into small pieces. Melt in a microwave just until melted.
In a large mixer bowl, beat cream cheese and sugar until light and fluffy. Add eggs one at a time while beating. Stir in sour cream and vanilla. Stir in the melted chocolate.
Pour mixture over flourless cake. Bake in the oven at 350 degrees for about 45-60 minutes (or more as needed) until set on the outside area, just still jiggly in the center.
Let cool to room temperature. Do not remove springform pan. Proceed to mousse step or cover cake with saran wrap and refrigerate until the next day.
Chocolate Mousse
1 ½ teaspoon unflavored gelatin
1 ½ tablespoon cold water
3 tablespoons boiling water
½ cup sugar
¼ + 1/8 cup cocoa powder (or 6 tablespoons)
1 ½ cup whipping cream
1 ½ teaspoon vanilla
In a small bowl, combine gelatin and cold water and allow to stand for about 1 minute. While gelatin is softening, bring about 1 cup of water to a boil in the microwave and measure out 3 tablespoons. Discard the rest. Whisk the 3 tablespoons of boiling water into the softened gelatin and allow to cool slightly.
In a medium mixing bowl, combine sugar, cocoa powder, whipping cream, and vanilla. Beat with an electric mixer until medium-stiff peaks form. Mix in gelatin mixture.
With springform ring still in place, add mousse on top of cheesecake, but you don’t have to add it all. This recipe allows for some mousse to be eaten! Cover cake with saran wrap and refrigerate until ready to top with ganache. Recommended set time 1 hour before removing springform and adding ganache.
Ganache
4 ounces bittersweet chocolate, coarsely chopped
1/2 cup heavy cream
2 teaspoons light corn syrup
Remove cheesecake from refrigerator to bring to more of a room temperature so ganache will not set too fast when poured on top.
Bring heavy cream just to a simmer, then pour over the chocolate. Stir very gently with a rubber spatula until the mixture is smooth and shiny. Stir in the corn syrup.
Allow to cool briefly - don't let the ganache cool too much or it will start to harden when it hits the cold mousse and be harder to spread. Remove Springform ring and pour over top. Put the cheesecake into the refrigerator about 20 minutes.
Shopping List
8 oz. bittersweet chocolate
6 oz. semisweet chocolate
1 cup cocoa powder
2 cups whipping cream
8 tablespoons butter
2 – 8 oz. cream cheese
5 eggs
1 1/3 cup sour cream
Unflavored gelatin
Although you can probably use chocolate chips, the chocolate bars will melt better and be fancier. We use a food processor to chop the chocolate because it takes a lot. We couldn't find bittersweet chocolate so we substituted semi sweet and it was great! So either is fine.
It has multiple steps and layers, but its not technically very hard. We love being able to cook the crust cake layer and cheesecake at the same time. Enjoy!

Servings: 16-20
Flourless Chocolate Cake (Crust)
4 ounces bittersweet chocolate, chopped and melted
1 stick butter (8 tablespoons), melted
¾ cup sugar
3 eggs
½ cup unsweetened cocoa powder
Preheat oven to 350. Spray a 9-inch springform pan with non-stick spray.
In a food processor, chop chocolate into small pieces. In microwave, melt butter. Add chocolate and microwave as needed just to melt chocolate.
Stir in sugar, eggs and whisk well. Sift unsweetened cocoa powder and mix in. Pour into the springform and set aside while preparing cheesecake layer.
Chocolate Cheesecake
6 1-ounce squares semi-sweet chocolate, chopped and melted
2 8-ounce packages cream cheese, softened
½ cup sugar
2 eggs
1 1/3 cups sour cream
¾ teaspoon vanilla extract
Chop chocolate in a food processor into small pieces. Melt in a microwave just until melted.
In a large mixer bowl, beat cream cheese and sugar until light and fluffy. Add eggs one at a time while beating. Stir in sour cream and vanilla. Stir in the melted chocolate.
Pour mixture over flourless cake. Bake in the oven at 350 degrees for about 45-60 minutes (or more as needed) until set on the outside area, just still jiggly in the center.
Let cool to room temperature. Do not remove springform pan. Proceed to mousse step or cover cake with saran wrap and refrigerate until the next day.
Chocolate Mousse
1 ½ teaspoon unflavored gelatin
1 ½ tablespoon cold water
3 tablespoons boiling water
½ cup sugar
¼ + 1/8 cup cocoa powder (or 6 tablespoons)
1 ½ cup whipping cream
1 ½ teaspoon vanilla
In a small bowl, combine gelatin and cold water and allow to stand for about 1 minute. While gelatin is softening, bring about 1 cup of water to a boil in the microwave and measure out 3 tablespoons. Discard the rest. Whisk the 3 tablespoons of boiling water into the softened gelatin and allow to cool slightly.
In a medium mixing bowl, combine sugar, cocoa powder, whipping cream, and vanilla. Beat with an electric mixer until medium-stiff peaks form. Mix in gelatin mixture.
With springform ring still in place, add mousse on top of cheesecake, but you don’t have to add it all. This recipe allows for some mousse to be eaten! Cover cake with saran wrap and refrigerate until ready to top with ganache. Recommended set time 1 hour before removing springform and adding ganache.
Ganache
4 ounces bittersweet chocolate, coarsely chopped
1/2 cup heavy cream
2 teaspoons light corn syrup
Remove cheesecake from refrigerator to bring to more of a room temperature so ganache will not set too fast when poured on top.
Bring heavy cream just to a simmer, then pour over the chocolate. Stir very gently with a rubber spatula until the mixture is smooth and shiny. Stir in the corn syrup.
Allow to cool briefly - don't let the ganache cool too much or it will start to harden when it hits the cold mousse and be harder to spread. Remove Springform ring and pour over top. Put the cheesecake into the refrigerator about 20 minutes.
Shopping List
8 oz. bittersweet chocolate
6 oz. semisweet chocolate
1 cup cocoa powder
2 cups whipping cream
8 tablespoons butter
2 – 8 oz. cream cheese
5 eggs
1 1/3 cup sour cream
Unflavored gelatin
Thursday, December 26, 2019
Donna's Apple Crisp
Here is a great recipe for apples. And it can be for breakfast or dessert! Because you know, apples are fruit and a great breakfast food.
Donna's Apple Crisp
4 c. Jonagold apples, or 1 qt. canned apples
3/4 c. packed brown sugar
1/2 c. flour
3/4 c. quick-cooking oats
1 tsp. cinnamon
1/4 cup softened butter
Ice Cream, optional
Preheat oven to 375 degrees. Spray a 8x8 inch pan with non-stick spray. Put peeled and cut apples in the pan, and add about 1/4 cup water. Mix remaining ingredients and sprinkle over apples. Cover with foil and bake 20 minutes. Remove foil and bake 10 minutes more.


Donna's Apple Crisp
4 c. Jonagold apples, or 1 qt. canned apples
3/4 c. packed brown sugar
1/2 c. flour
3/4 c. quick-cooking oats
1 tsp. cinnamon
1/4 cup softened butter
Ice Cream, optional
Preheat oven to 375 degrees. Spray a 8x8 inch pan with non-stick spray. Put peeled and cut apples in the pan, and add about 1/4 cup water. Mix remaining ingredients and sprinkle over apples. Cover with foil and bake 20 minutes. Remove foil and bake 10 minutes more.


Cookie Decorating for a Crowd
I was going through some old pictures and came across these gems! Wow! So adorable! This was December 2014.
I've since done many cookie decorating parties for kids, and it always works great! A single batch of Donna's Sugar Cookies makes about 75 Christmas cookies (trees, stockings, snowmen, gingerbread men, candy canes, etc). I usually have about 1 or 2 cans of frosting from the store. Vanilla is always great (like in these pictures), but I think a can of red and green is fun too. I put the frosting in paper bowls, add plastic knives, and some sprinkles and you'll have a great cookie decorating party. Or cookie eating party. When the party is over, I throw away all the leftover frosting and plastic knives. Once you watch kids decorate with it, and lick their hands, and go back for seconds, you'll know why it's best to just throw it out at the end of the party. For an extra easy cleanup, just add a disposable tablecloth.


I've since done many cookie decorating parties for kids, and it always works great! A single batch of Donna's Sugar Cookies makes about 75 Christmas cookies (trees, stockings, snowmen, gingerbread men, candy canes, etc). I usually have about 1 or 2 cans of frosting from the store. Vanilla is always great (like in these pictures), but I think a can of red and green is fun too. I put the frosting in paper bowls, add plastic knives, and some sprinkles and you'll have a great cookie decorating party. Or cookie eating party. When the party is over, I throw away all the leftover frosting and plastic knives. Once you watch kids decorate with it, and lick their hands, and go back for seconds, you'll know why it's best to just throw it out at the end of the party. For an extra easy cleanup, just add a disposable tablecloth.


Carl's Pecan Pie


Jason loves Carl's Pecan Pie. However, his body doesn't love carbs anymore. This Thanksgiving I had a little oval Ramekin I used and baked a mini Pecan Pie. It worked great! I made a 1/3 recipe and shortened the cooking time. So this recipe is very adaptive to larger or smaller sizes.
Sunday, January 12, 2014
No Bake Mango Dulce de Leche Cheesecake

Ingredients:
1 1/2 cups graham cracker crumbs
1/3 cup butter, melted
1/2 cup NESTLÉ LA LECHERA FAT FREE Sweetened Condensed Milk
1/2 cup NESTLÉ LA LECHERA Dulce de Leche
1 package (8 ounces) 1/3 less fat cream cheese, at room temperature
2 envelopes (7 grams each) unflavored gelatin, divided
1/4 cup plus 2 tablespoons boiling water, divided
1 1/2 cups mango puree (from about 3 mangos, or frozen, thawed mango chunks)
Directions
GREASE 9-inch springform pan.
COMBINE graham cracker crumbs and melted butter in a small bowl. Press onto bottom of prepared pan. Refrigerate for 15 minutes.
BEAT sweetened condensed milk, dulce de leche and cream cheese in large mixer bowl until smooth. Vigorously mix 1 envelope gelatin and ¼ cup boiling water in small bowl with a fork until gelatin is completely dissolved (about 3-4 minutes). Immediately beat into cream cheese mixture with hand held electric mixer until combined. Pour over crust; gently smooth top. Refrigerate for 1 hour or until set.
MIX vigorously the remaining envelope gelatin with remaining 2 tablespoons boiling water in small bowl with a fork until gelatin is completely dissolved (about 3-4 minutes). Immediately blend into mango puree with hand held electric mixer until combined. Pour over set cheesecake; gently smooth top. Refrigerate for 1 hour or until set.
SERVE with sliced mangoes on top, if desired.
BEST if served with Brazilian mango drink, which I do not have a recipe for. Jenny!!??

Taken from this website.
Sunday, December 22, 2013
Perfect Gingerbread Cookies

Every year when we have our Annual Gingerbread House Party, I have to make these cookies. They are the perfect Gingerbread Cookie. That are soft and spicy and delicious. They don't even need frosting!
Gingerbread Cookies by Our Best Bites
1 c. butter
1 c. sugar
1 c. molasses
2 egg yolks
4 c. flour
1 tsp. salt
1 tsp. baking powder
1 tsp. baking soda
1 tsp. cinnamon
1 tsp. cloves
1 tsp. ginger
1 tsp. nutmeg
Directions
- Cream butter and sugar. Add molasses and egg yolk. In a medium bowl, combine remaining ingredients. Add flour mixture to butter mixture. Chill for at least an hour. It’s a fairly sticky dough so you might need to chill it a little longer.
- Preheat oven to 350. Roll dough to 1/4″ thick and cut with cookie cutters. Place cookies 2″ apart on a baking sheet. Bake 8-10 minutes. If you bake them on the short end they will stay soft and chewy and if you bake them on the longer end they will be nice and crispy. They’re great either way!
- Allow to cool about 5 minutes on pan and then transfer to wire rack and cool completely. Once they’re cooled you can decorate your heart out.
Cranberry Nut "Bread"

There is a beloved recipe I've been cooking for over a decade called Cranberry Nut Bread. I always have it out for Thanksgiving breakfast, and sometimes for Christmas morning.
I have a secret. All these years I've led you all to believe that I was making a perfect brunch food called "Cranberry Nut Bread." Here's the truth: It's called "Cranberry Nut Dessert" and the original recipe recommends you serve it with ice cream or whipped cream.
Because I love you all, here is the recipe so you can make it. Enjoy! I love to double or triple it. And I LOVE to eat it for breakfast.
Cranberry Nut "Bread" by Taste of Home
1 cup all-purpose flour
1 cup sugar
1/4 teaspoon salt
2 cups fresh or frozen cranberries
1/2 cup chopped walnuts
1/2 cup butter, melted
2 large eggs, beaten
1/2 teaspoon almond extract
Whipped cream or ice cream, optional
Directions
- In a bowl, combine the flour, sugar and salt. Add cranberries and nuts; toss to coat. Stir in the butter, eggs and extract (mixture will be very thick if using frozen berries). Spread into a greased 9-in. pie plate.
- Bake at 350° for 40 minutes or until a toothpick inserted in the center comes out clean. Serve warm with whipped cream or ice cream if desired.
Donna's Sugar Cookies and Glaze

My friend was having trouble with cookies. She says they always came out yucky. After our day together baking cookies, she discovered that her cookies didn't work because she wasn't mixing the ingredients in the right way, in the right order. She was adding all the ingredients to a bowl and mixing. Cookies don't work that way! If you use this recipe and follow all the steps, you'll have amazing cookies.
First, make sure your butter is at room temperature. If not, cut it into tablespoon sized segments, put it on a plat and microwave for 10 seconds. It should feel as soft as play dough. Then add your butter to a mixer and mix just to make sure it's nice and smooth. Add the sugar and cream together. It should look like beach sand when well mixed.
Then add the eggs one at a time. It will look like soupy beach sand. Add the vanilla.
Then add the flour, salt and baking powder. Technically you're supposed to mix all three dry ingredients together and then add to the mixture. I find that I can add a little of each until all three are added to save time and dirty one less bowl.
Divide the dough into three or four parts. Pour onto plastic wrap and wrap it up, then smash it flat into a disk shape. Let chill for at least an hour, or for a couple days if you want to make the dough in advance.
Roll out the dough to a 1/4 inch thickness and cut into shapes. Bake at 400 degrees for 6-10 minutes, depending on how hot your oven cooks, how big your shape is, and how thick your cookie is. Your cookie is done baking when the edges are barely set and the center is still doughy. The cookies will be all white with no browning at all.
Let cook for 1-2 minutes and then move to a cooling sheet. They will be ready to decorate as soon as they are cool, usually about 5 minutes later.
To make the glaze, just add all the components to a mixing bowl and mix. If it's too thick, add milk. If it's too thin, add more powdered sugar. I like to drizzle it on the cookies and then add sprinkles. It will set in a hour or two. Then you can move them to a plate and cover.
Last year I made too many sugar cookies. I put them in the freezer where they sat all year long. When Liz needed to take a treat to school we pulled them out at 8:00am, decorated with a can of frosting and sprinkles, and sent her off to school at 8:30am. So if you want to plan ahead, these freeze well!
Donna's Sugar Cookies and Glaze
Makes 9-10 dozen 1-1/2 inch scalloped circle cookies
1 1/2 cups butter, softened
2 cups granulated sugar
4 eggs
1 tsp. vanilla
5 cups all purpose flour
2 tsp. baking powder
1 tsp. salt
Glaze
4 c. powdered sugar
2 tbsp. + 2 tsp. light corn syrup
2 tbsp. + 2 tsp. milk (more or less to get the consistency right)
1 tsp. vanilla
1/2 tsp. almond extract
1. Cream butter and sugar together.
2. Add eggs one at a time, mix well. Add vanilla.
3. Add flour, baking powder and salt. Mix well.
4. Divide into 3 or 4 parts. Pour onto a sheet of plastic wrap, shape into a disk, wrap with plastic wrap. Chill for one hour or for several days.
5. Preheat oven to 400 degrees. Roll out cookie dough to 1/4 inch. Cut into shapes and bake for 6-10 minutes, until the edges are barely set and center is still doughy.
6. Let cool for 1-2 minutes on baking sheet and then move to a cooling rack. Let cool for 5 minutes and then glaze.
To make glaze, add all components in a mixing bowl. If it's too thin, add more powdered sugar. If it's too thick, add more milk. I often add more milk until the glaze drizzles off a spoon.
Rolo Pretzel Turtles
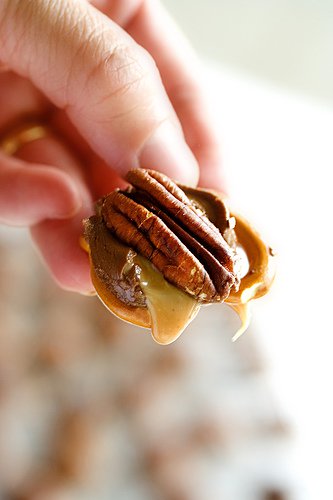
This recipe saved me! I'm in the Primary Presidency and we needed to think of a Christmas gift for 35 primary workers. We decided to make 5 dozen cookies each, then we could bag them up and deliver them to each Primary Worker. Five dozen cookies is no big deal. One batch of chocolate chip cookies will make 5 dozen cookies.
But then my friend in the Primary Presidency asked if I could teach her how to bake cookies since she has trouble making great cookies. So then I realized I had to figure out how to make make 10 dozen cookies within days of Christmas and crazy holiday activities. That's a lot! Then I found this recipe...
Rolo Pretzel Turtles by Steamy Kitchen
Preheat your oven to 350
1. Upwrap your Rolos. Place pretzels on baking sheet. Top with a Rolo.
2. Bake in oven for 3-5 minutes, until the chocolate just begins to melt. The Rolo should be soft but not completely melted.
3. Remove from oven, place on cooling rack and immediately squish the chocolate with a nut. Watch the caramel oooze out.
Thanks, Steamy Kitchen! In addition to making sugar cookies from scratch, my friend and I easily made 100 of these and they were a huge hit at church! I gave a bag of a half a dozen to a friend and she ate them all in 5 minutes. AND she's passionate about healthy, organic food. If she can make an exception for Rolo Pretzel Turtles, then these are a hit!
I bought a bag of pretzels for $3 and two bags of rolos at $2.66 each. With an economy sized bag of pecans in my freezer ready to use it was a very affordable treat.
Tuesday, June 18, 2013
Strawberry Pineapple Milkshakes
We took a parenting class at church. They taught that if a kid wants to help you with a task, just let them help. It doesn't matter if you can do it faster or better. The teachers said that the time will come when they won't want to help you, so when they do you need to let them! Apparently all my kids are at the helping age because I always have helpers in the kitchen.
Yes, all the boys have knives. It worked out great. So don't be afraid!

Yikes! Be afraid!

Get your helpers to hull your strawberries. That's a fancy way of saying get rid of the leaves. Then chop up the strawberries. This recipe is perfect for kids because it doesn't matter what size they chop them up or if the dice is uneven. It's all going into the blender anyway.

Add sugar to your strawberries and mix. I added about 1/4 cup to 3 or 4 cups diced strawberries.

Taste test it if you want! Then let it sit in your refrigerator for about an hour.

On to the pineapple! Pineapples are in season right now. If you can't find a ripe pineapple and your pineapple is still pretty green, you'll want it to ripen on your counter for a day or two. You know a pineapple is ripe when the bottom smells like a delicious pineapple and it has a nice yellow tint to it.
This pineapple is perfectly ripe. Let's cut it up! I had my helpers watch since I used a BIG knife. Safety first! Cut off the pineapple's top and bottom.

Then slice off the outside inedible layer.

Poor pineapple! You're no match for my big knife!

Cut the pineapple into four long spears.

Then cut the core out of each spear. I know it looks like I'm about to slice off my knuckle. I didn't. And Steve was a great cameraman!

Then slice each spear into two or three long spears.

Next, cut each spear into 1" chunks.

After an hour in the fridge, check out your strawberries! See that juice at the bottom?

The sugar combined with the strawberries to make a delicious strawberry juice. These strawberries are perfect for strawberry shortcake (but that's a different recipe).

Add some of the strawberries and juice, and some pineapple to the blender and mix until it is creamy. Add a couple scoops of vanilla ice cream and mix it up. You're done! I fed this to my family after a hard day's work in the yard. They said it was the best smoothie they ever had. Since it's actually a milkshake I don't know how to take that... They said I was the best mom in the world so if you want some appreciation, this is the recipe for you.

Strawberry Pineapple Milkshakes
Serves 3-6
2 pints of strawberries
1 pineapple
1/4 c. sugar
several scoops Vanilla Ice Cream
1. Hull and chop strawberries. Mix with sugar (about 1/4 cup sugar for every 3-4 cups strawberries). Let sit in the refrigerator for one hour.
2. Chop pineapple.
3. Add strawberries and juice, and pineapple to a blender and mix well. Add several scoops of ice cream. Serve and bask in the glory of your admiring fans!
And remember, a pineapple should never touch human skin:
Yes, all the boys have knives. It worked out great. So don't be afraid!

Yikes! Be afraid!

Get your helpers to hull your strawberries. That's a fancy way of saying get rid of the leaves. Then chop up the strawberries. This recipe is perfect for kids because it doesn't matter what size they chop them up or if the dice is uneven. It's all going into the blender anyway.

Add sugar to your strawberries and mix. I added about 1/4 cup to 3 or 4 cups diced strawberries.

Taste test it if you want! Then let it sit in your refrigerator for about an hour.

On to the pineapple! Pineapples are in season right now. If you can't find a ripe pineapple and your pineapple is still pretty green, you'll want it to ripen on your counter for a day or two. You know a pineapple is ripe when the bottom smells like a delicious pineapple and it has a nice yellow tint to it.
This pineapple is perfectly ripe. Let's cut it up! I had my helpers watch since I used a BIG knife. Safety first! Cut off the pineapple's top and bottom.

Then slice off the outside inedible layer.

Poor pineapple! You're no match for my big knife!

Cut the pineapple into four long spears.

Then cut the core out of each spear. I know it looks like I'm about to slice off my knuckle. I didn't. And Steve was a great cameraman!

Then slice each spear into two or three long spears.

Next, cut each spear into 1" chunks.

After an hour in the fridge, check out your strawberries! See that juice at the bottom?

The sugar combined with the strawberries to make a delicious strawberry juice. These strawberries are perfect for strawberry shortcake (but that's a different recipe).

Add some of the strawberries and juice, and some pineapple to the blender and mix until it is creamy. Add a couple scoops of vanilla ice cream and mix it up. You're done! I fed this to my family after a hard day's work in the yard. They said it was the best smoothie they ever had. Since it's actually a milkshake I don't know how to take that... They said I was the best mom in the world so if you want some appreciation, this is the recipe for you.

Strawberry Pineapple Milkshakes
Serves 3-6
2 pints of strawberries
1 pineapple
1/4 c. sugar
several scoops Vanilla Ice Cream
1. Hull and chop strawberries. Mix with sugar (about 1/4 cup sugar for every 3-4 cups strawberries). Let sit in the refrigerator for one hour.
2. Chop pineapple.
3. Add strawberries and juice, and pineapple to a blender and mix well. Add several scoops of ice cream. Serve and bask in the glory of your admiring fans!
And remember, a pineapple should never touch human skin:
Sunday, June 2, 2013
Dannie's Cherry Tart
Dannie will probably tell you that this is Aunt Zoe's Cherry Tart, but to us Harpers it will always be "Dannie's Cherry Tart." This is a classic Harper recipe and the perfect way to kick off our food blog. Who's hungry? Let's get started!
 You'll need sugar, flour, butter, pecans, Dream Whip (only one box, not two like in the picture), cream cheese, vanilla, milk and cherry pie filling. It's best if you leave your cream cheese and butter out to soften for a couple hours ahead of time.
There are three parts to this recipe: The crust, the cream filling, and the cherry goodness.
First, start with the crust. If you didn't leave your butter out to soften (you rebel!), just cut it into 6-8 pieces, put it on a plate, and put it in the microwave for about 8-10 seconds, give or take depending on your microwave power. It should be soft to the touch but not liquid. Like butter.

Add your softened butter, flour, sugar, and chopped pecans to a 9x13 inch glass baking dish. Your dish does not need to be greased (now is a good time to preheat your oven!).

Then get yourself a cute assistant and get her to mash it up. It should be crumbly, it will look like sand with pecans in it. The butter will be a great moisturizer for us desert dwellers.

Dannie taught me to gently pat it down. Don't press it hard or it will be too dense.

Bake it for 10-20 minutes at 400 degrees (my oven took 17 minutes for golden brown perfection).

While it's still warm, take a fork and run it through the crust. You'll crumble it up into nice bite size pieces. Then pat it back down (gently! Unless you like chewing a brick) and let it cool completely. It will take about one hour to cool down on the counter (or faster in the fridge if you're not patient, or have an angry, hungry mob of Harpers waiting for Cherry Tart).

While the crust was baking, my cute assistant and I worked on the cream filling. Dream Whip isn't a familiar ingredient to many of us. I usually find it in the baking aisle near the Jello mixes. It comes in a box with two envelopes of Dream Whip mix inside. You'll use two envelopes of mix (sold together in one box of Dream Whip) for this recipe.
Mix the Dream Whip according to the package directions with a mixer (add milk and vanilla, and then mix for about 4 minutes, until it thickens and forms peaks). You can mix both envelopes at once. It will be creamy and white (like something dreamy and whipped). Then add sugar, cream cheese and more vanilla and mix until smooth. It's very important that your cream cheese be at room temperature or when you try to mix it in it will look like cottage cheese. Your Cherry Tart will thank you for leaving the cream cheese out at room temperature for several hours.
When you're done it will look like shiny frosting and have about the same consistency.


When you're done mixing, get a second cute assistant to clean your beater.

If your crust still isn't cool, put your bowl of cream filling in the fridge. When the crust is cool just pour it on top and spread it over the crust.

Next, add your cherry pie filling with a spoon. Dannie taught me to put them on 2 cherries at a time. But it was late so I plopped on 5 or more at a time. It all tastes the same when you eat it! But her's will be prettier!

Look at those layers of goodness! Now chill it for 3 hours. Or not, I won't judge you.

Next, feed it to a Harper. They will thank you!

Since Dannie taught me this recipe I have made it twice. Once when we lived in Indiana and then this time just for the blog. She's the expert and Mom makes it best. However, if you live far away and long for a taste of home, make a cherry tart! I forgot how easy it is! It makes 2 or 12 or 16 servings depending on your weight loss or gain plan.
And now for the prizes! As the winner of our first food blog contest, for naming this blog, Summer will recieve a box of Dream Whip and two cans of cherry pie filling, and maybe some other non-perishable ingredients if I can fit it in the box. Not only did Summer show great creativity in choosing a name, but she took into account our Harper Trek-i-ness. Good job, Summer!
For submitting name ideas, our runner up is Heidi. She received a box of Dream Whip and also did a good job modelling her prize. Thanks, Heidi!
 Here is the full recipe:
Dannie's Cherry Tart
Serves: 12 (or less, I won't judge you)
Time: A couple hours since you have to let the crust cool. Never too long to make a Harper's day!
Crust:
1/2 cup sugar
1 cup pecans, chopped
2 cups flour
1 cup butter, softened
Topping:
2 envelopes Dream Whip, sold together in one box
1 cup cold milk (according to Dream Whip directions)
1/2 tsp. vanilla (according to Dream Whip directions)
8 ounces cream cheese, softened
1 cup sugar
1 tablespoon vanilla, in addition to vanilla previously added
2 cans cherry pie filling
1. In a 9x13 inch pan, crumble crust ingredients together and lightly smooth onto bottom of pan.
2. Bake at 400 degrees for 10-20 minutes, until browning on sides and top. My oven took 17 minutes.
3. While still warm, crumble and gently pat onto bottom of pan. Let cool. It takes one hour to cool on the counter.
4. Mix Dream Whip according to directions on package.
5. Add cream cheese, sugar and vanilla; mix well.
6. Spread over cooled crust. Spoon cherry filling to top of filling.
7. Chill for 3 hours and serve.

There are three parts to this recipe: The crust, the cream filling, and the cherry goodness.
First, start with the crust. If you didn't leave your butter out to soften (you rebel!), just cut it into 6-8 pieces, put it on a plate, and put it in the microwave for about 8-10 seconds, give or take depending on your microwave power. It should be soft to the touch but not liquid. Like butter.

Add your softened butter, flour, sugar, and chopped pecans to a 9x13 inch glass baking dish. Your dish does not need to be greased (now is a good time to preheat your oven!).

Then get yourself a cute assistant and get her to mash it up. It should be crumbly, it will look like sand with pecans in it. The butter will be a great moisturizer for us desert dwellers.

Dannie taught me to gently pat it down. Don't press it hard or it will be too dense.

Bake it for 10-20 minutes at 400 degrees (my oven took 17 minutes for golden brown perfection).

While it's still warm, take a fork and run it through the crust. You'll crumble it up into nice bite size pieces. Then pat it back down (gently! Unless you like chewing a brick) and let it cool completely. It will take about one hour to cool down on the counter (or faster in the fridge if you're not patient, or have an angry, hungry mob of Harpers waiting for Cherry Tart).

While the crust was baking, my cute assistant and I worked on the cream filling. Dream Whip isn't a familiar ingredient to many of us. I usually find it in the baking aisle near the Jello mixes. It comes in a box with two envelopes of Dream Whip mix inside. You'll use two envelopes of mix (sold together in one box of Dream Whip) for this recipe.
Mix the Dream Whip according to the package directions with a mixer (add milk and vanilla, and then mix for about 4 minutes, until it thickens and forms peaks). You can mix both envelopes at once. It will be creamy and white (like something dreamy and whipped). Then add sugar, cream cheese and more vanilla and mix until smooth. It's very important that your cream cheese be at room temperature or when you try to mix it in it will look like cottage cheese. Your Cherry Tart will thank you for leaving the cream cheese out at room temperature for several hours.
When you're done it will look like shiny frosting and have about the same consistency.


When you're done mixing, get a second cute assistant to clean your beater.

If your crust still isn't cool, put your bowl of cream filling in the fridge. When the crust is cool just pour it on top and spread it over the crust.

Next, add your cherry pie filling with a spoon. Dannie taught me to put them on 2 cherries at a time. But it was late so I plopped on 5 or more at a time. It all tastes the same when you eat it! But her's will be prettier!

Look at those layers of goodness! Now chill it for 3 hours. Or not, I won't judge you.

Next, feed it to a Harper. They will thank you!

Since Dannie taught me this recipe I have made it twice. Once when we lived in Indiana and then this time just for the blog. She's the expert and Mom makes it best. However, if you live far away and long for a taste of home, make a cherry tart! I forgot how easy it is! It makes 2 or 12 or 16 servings depending on your weight loss or gain plan.
And now for the prizes! As the winner of our first food blog contest, for naming this blog, Summer will recieve a box of Dream Whip and two cans of cherry pie filling, and maybe some other non-perishable ingredients if I can fit it in the box. Not only did Summer show great creativity in choosing a name, but she took into account our Harper Trek-i-ness. Good job, Summer!
For submitting name ideas, our runner up is Heidi. She received a box of Dream Whip and also did a good job modelling her prize. Thanks, Heidi!

Dannie's Cherry Tart
Serves: 12 (or less, I won't judge you)
Time: A couple hours since you have to let the crust cool. Never too long to make a Harper's day!
Crust:
1/2 cup sugar
1 cup pecans, chopped
2 cups flour
1 cup butter, softened
Topping:
2 envelopes Dream Whip, sold together in one box
1 cup cold milk (according to Dream Whip directions)
1/2 tsp. vanilla (according to Dream Whip directions)
8 ounces cream cheese, softened
1 cup sugar
1 tablespoon vanilla, in addition to vanilla previously added
2 cans cherry pie filling
1. In a 9x13 inch pan, crumble crust ingredients together and lightly smooth onto bottom of pan.
2. Bake at 400 degrees for 10-20 minutes, until browning on sides and top. My oven took 17 minutes.
3. While still warm, crumble and gently pat onto bottom of pan. Let cool. It takes one hour to cool on the counter.
4. Mix Dream Whip according to directions on package.
5. Add cream cheese, sugar and vanilla; mix well.
6. Spread over cooled crust. Spoon cherry filling to top of filling.
7. Chill for 3 hours and serve.
Subscribe to:
Posts
(Atom)